Wikipedia defines Center of Excellence (COE) as “a team, a shared facility or an entity that provides leadership, best practices, research, support and/or training for a focus area”.
LocalClarity is building a Center of Excellence to provide leadership, best practices, research, support and training in the fields of reputation management and location search presence for multi-location businesses and the agencies that serve them.
The goal is to develop and actively share resources that go beyond simply “how to do something” and serve to help organizations “streamline, structure and simplify” their operations and cause insights to be more readily identified and made actionable.
We will be presenting new articles each month, with a focus on one or more of the core areas of Data, Reporting, User Experience, Content, Administration, Technology, Process.
Abstract
A properly optimized Google My Business listing is one of the most effective ways of generating new leads and new customers for location-based businesses, but to bridge the gap between local search traffic and the resulting ROI of that traffic, brands need to create a tracking bridge between the click on GMB and the resulting full set of activity on the website. This Center of Excellence article presents all of the steps and decision points necessary for you to set up a comprehensive tracking infrastructure for your organization to provide persistent and accurate visibility to the website traffic and associated activity generated from each site visit originated from all local exposure — GMB, Local Posts, TripAdvisor, Facebook, Yelp and more.
Google My Business & Local Tracking – A Comprehensive Approach
We all want better data to be able to make decisions, but Google doesn’t always give us the data we need, or in a format that we can actually use. This definitely applies to the data that Google provides for us in the Insights section of our GMB dashboard, especially for multi-location businesses.
The tracking that we do with LocalClarity helps to visualize the local search exposure of GMB listings as well as the actions of calls, driving directions, and website clicks. It is the insights that can be derived from these clicks that is materially enhanced by setting UTM tracking parameters for all URLs.
UTM Codes
If you don’t know what a UTM tracking code is, they are just extra parameters that you add to the end of an URL. They do not change the page in any way, it just lets you see when that specific URL has been loaded. An example UTM code for tracking local would change an URL from this:
www.yourdomain.com
to this
www.yourdomain.com/?utm_source=local&utm_medium=organic&utm_campaign=gmb&utm_content=LC12
It may look complicated, but the pieces are just added words for tracking.
UTM parameters provide information directly to Google Analytics so it can better track where your traffic comes from and what that traffic does when it arrives on your company’s website. You’ll obtain basic engagement information about visitors, such as their average session, bounce rate, and conversion rates. Remember that not all visitors are the same, so Google helps you to see where your active customers are coming from.
A bit of trivia. “UTM” stands for “Urchin tracking module.” Urchin Software Corporation was acquired by Google in 2005, and their software laid the groundwork for what we now know as Google Analytics.
UTM Code Best Practices
By following a number of consistent best-practices, it will be easier to establish and maintain a consistently applied tracking structure for Google My Business and all other marketing channels.
First, make a specific decision on dashes vs. underscores for all parameters names (never use spaces!). Most industry veterans specifically recommend dashes. Matt Cutts explains why here.
Second, stay consistent or you could miss out on the ability to draw accurate automated conclusions. For example, all your social media posts should share the utm_medium “social.” If some are “social” but others are “social_media,” graphs will create a separate bar for each of them.
Third, use lowercase throughout all of your campaigns since they are case-sensitive. For example, utm_source=local is different from utm_source=Local.
Fourth, keep your URLs clean, descriptive, non-redundant and easy to read. This is especially important when you want to try to look at performance metrics across sources. For example, if you universally use the StoreCode for all location-based links, you can roll-up performance for Facebook, Yelp, and TripAdvisor for each location.
Fifth, keep records of the tagged links to ensure that your marketing team stays on the same page. Creating a naming convention guide document that lays out clear instructions for tagging links is preferred. This can be an iterative and expanding guide – if you come across a new scenario, you can add the example to this document.
Remember, the UTM parameters are visible to the users in their address bars. So, be transparent and don’t use values that you don’t want to be seen by the user.
Step 1. Create UTM Code Structures
To create your first set of UTM codes, you can use the Google Developer Tools Campaign URL Builder (screenshot below). All you need to do is simply put in the right information into the appropriate fields. Here are a few recommendations.
- Website URL – Put the root URL or whatever page you are linking to in your listing, typically the dedicated page for each location.
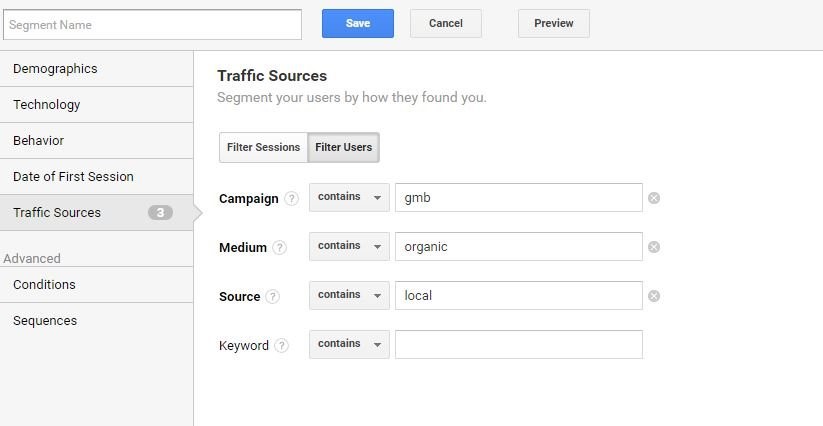
- Campaign Source – Use “local” as the source since Google My Business is part of my local SEO campaign.
- Campaign Medium -Use “organic” since GMB listings are from organic searches.
- Campaign Name – Use “gmb”, but you can use or whatever you think is appropriate here. You can vary the campaign name to track each element’s link. Examples might be “gmb-site”, “gmb-post”, or “gmb-post-12345”.
- Campaign Content – Use the GMB StoreCode or any other location identifier
Once you input these values into the appropriate fields, your new tracking URL will auto-populate in the box at the bottom.
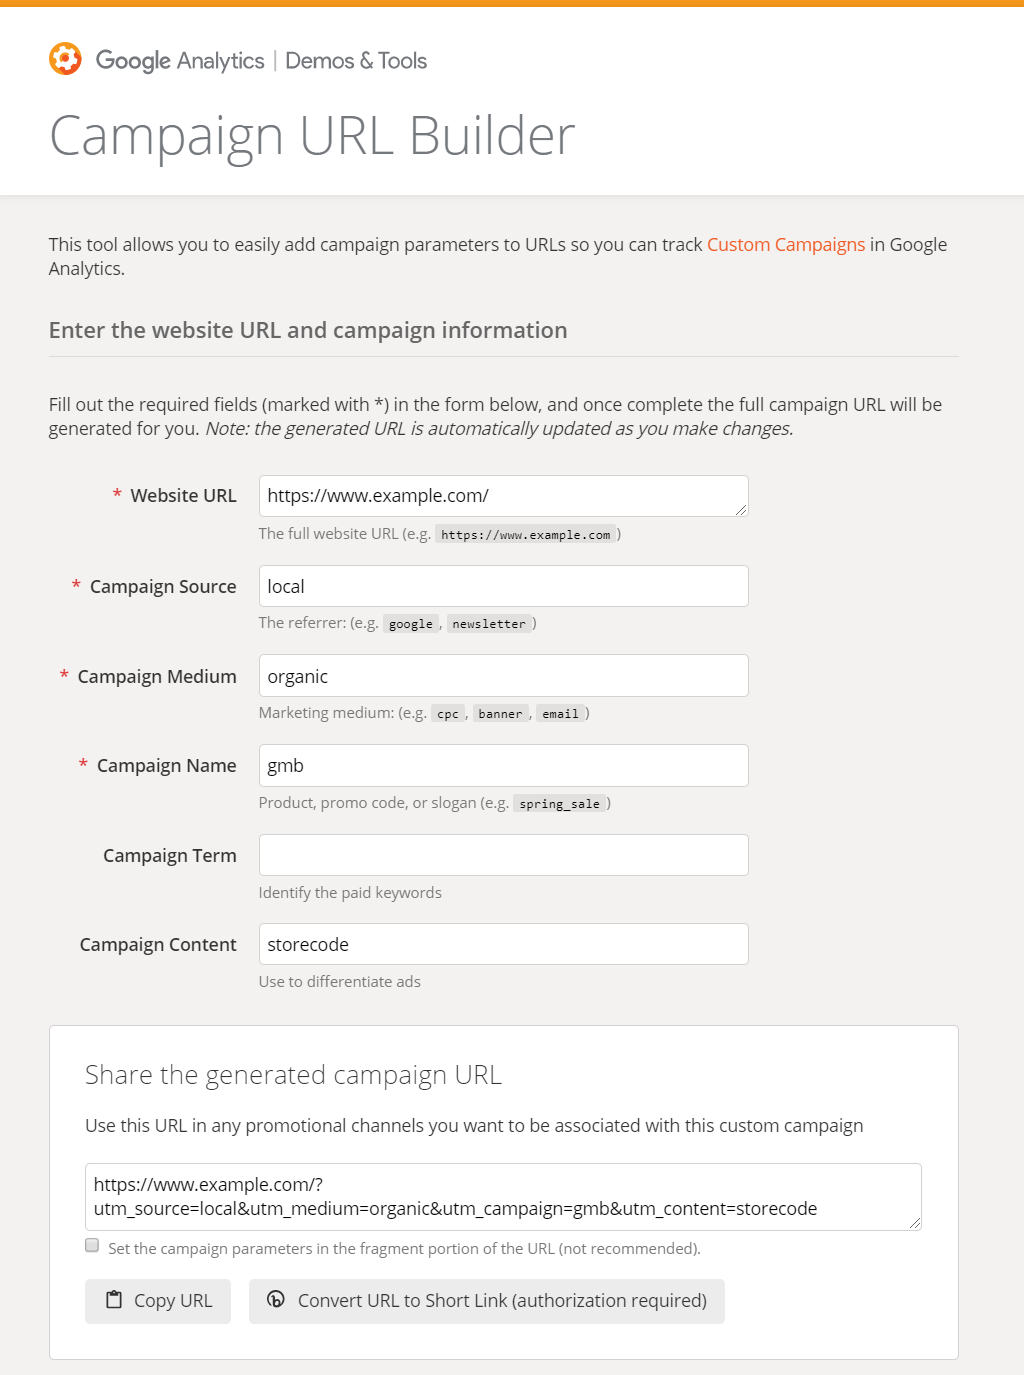
The Campaign Content parameter can be used to identify each Google My Business listing. This will allow you to create a unique URL for every location.
Step 2. Organize Tracking Codes
The best way to build out the list of links for a multi-location business is to use Excel or Google Sheets, leveraging the concatenation function. It operates identically to the link builder above, with each row representing the tracking link.

Use as the Core URL a secure (i.e., https) link to any dedicated store pages. If your site doesn’t maintain a unique page for each location you can simply use the home page for building out the links. Agencies can follow this exact process, simply providing the appropriate Core URLs for each client site location.
Step 3. Option #1, Updating URLs Individually in GMB Dashboard
Once you’re all set with creating your new UTM tracking URL, you need to add it to each of your listings. To do this, you can simply go to your GMB account dashboard and select either info or edit. This will bring up a new screen with your company information. Scroll down to find the existing URL and replace it with the new UTM tracking URL.
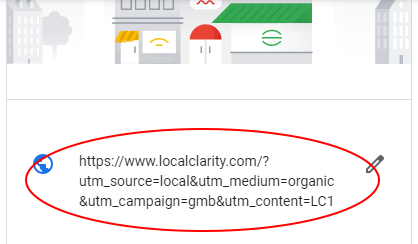
Step 3. Option #2, Updating URLs Individually in LocalClarity
Navigate to the Location Management section. Search for the correct location and then edit the edit pencil for the location details. In the screen, scroll down to identify the website link. Simply edit the link here and the update will push directly to GMB and the public Knowledge Panel within just a few minutes.

Step 3. Option #3, Updating URLs in Bulk in LocalClarity
The LocalClarity platform makes it easy to transfer the tracking URLs you may have organized in Excel or Google Sheets by offering a bulk upload option. Navigate to Location Management and in the upper right corner, click on Manage Bulk Activity button. By clicking on “Bulk Upload GMB Detail” you will be presented with a dialog box that presents instructions for bulk edits to all GMB location details.
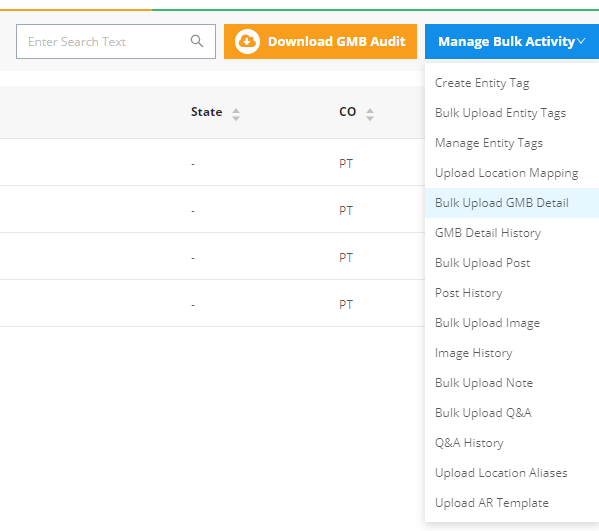
We recommend that you reach out to us at [email protected] for assistance with any initial bulk edit. We will help to prepare the file for you and review the process to make certain the upload runs smooth.
Step 4. Setting Up Google Analytics Tracking
Once your new URL is live on your listing, you need to now be able to track it in Google Analytics. The way to do this is by creating a new segment within your GA property. To create a new segment you simply click “Add New Segment”.

This will bring up a list of all existing default segments. Once this appears, select the red “+ New Segment” button. This will display the screen shown below.
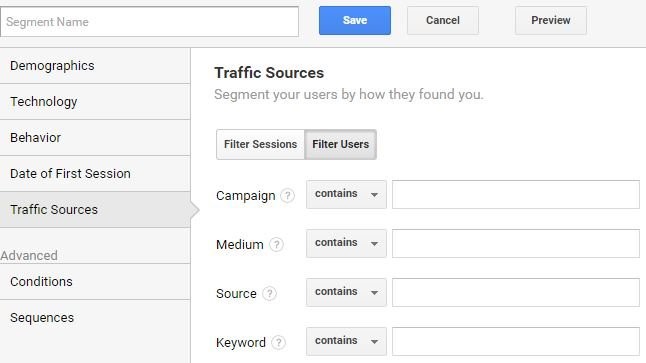
Choose “Traffic Sources” on the left and this will display the correct info that needs to be filled out. When filling out the fields, all you simply do is match the sections to the same as when you created the UTM tracking code.
Step 5. Seeing GMB Traffic in Google Analytics
Now that you have correctly set up your Google My Business tracking within Google Analytics, you need to be able to start seeing the traffic. There are a couple of ways you can do this. The first method is to look within Source / Medium. To get here, simply go to Acquisition > All Traffic > Source / Medium.
A better way to see your Google My Business traffic within Google Analytics is to look at the campaigns. To see this, all you simply do is look under Acquisition again then Campaigns > All Campaigns. This will display the following screen.

Google Posts
The same process for developing site links can be used to track all links from Google My Business local search results. When establishing call-to-action links in Google Posts, you will want to follow similar processes and best practices. If you plan to test the relative performance of your Google Posts, construct a plan to track links for the different types of posts (standard, offer, event), media (photo vs video) or even the allowable button text.
Google Post tracking is particularly important given the consistent under-reporting of Post clicks directly in GMB Insights data.
Appointment URL Tracking
The most important link to track for certain types of businesses is the Appointment URL. This, more than any other link made available to potential customers, is the one most closely connected to revenue generation. It’s critical to understand the flow of traffic and whether or not this flow converts.
All Other Location Pages
To gain full visibility to the website impacts of each location’s local presence, UTM tracking parameters should be placed on Facebook local pages, TripAdvisor pages, Zomato pages, TrustPilot, etc. By following the same structures and using the StoreCode as a universal identifier you can gain an understanding of the growing impacts of locally influenced site traffic.
Taking Advantages of the Mistakes of Others
The team at Terminus has put together a great article specifically calling out some of the UTM mistakes they’ve identified at some of the largest digital properties in the world, including Google. You can review ten email examples of gaffes and best practices in action.
