
LocalClarity simplifies Google Business Profile posts for single or bulk locations, maximizing outreach efficiency.
Posts on your Google Business Profile are a great way to keep customers up to date on What's New, Events, and Offers that your location is having. LocalClarity makes it easy to publish Posts both for individual locations and in bulk. This article will walk through the different capabilities of what you can and can't do when it comes to Google Posts as well as how and where in the platform you can create and publish your own Posts.
Post Workflows
Let's say one of your locations has something coming up that your customers/future customers need to know about. That's where Posts are most effective, because of their two pronged approach. While social media is great to let followers in on updates, Posts also reach those searching for your brand or your services. So, think of Posts as a fuller funnel approach to updates.
We've updated our posting workflow to be driven by the Bulk Post Workflow. This is an effective workflow for individual posts as well as posts in bulk. This workflow can be triggered from multiple locations in the platform.
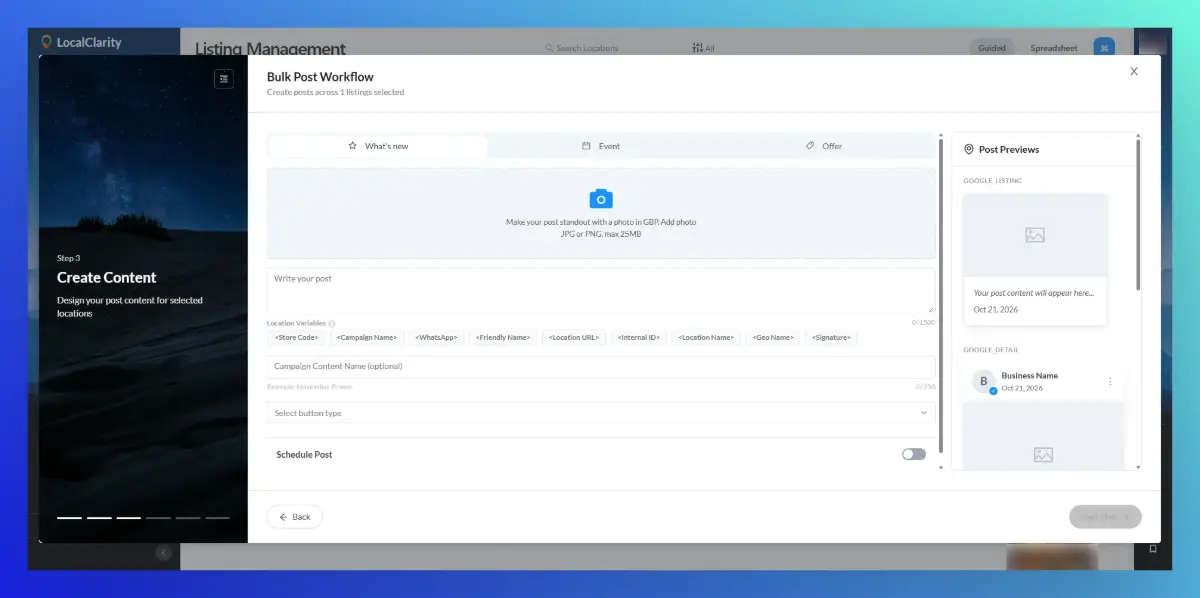
The post workflow provides three options for types of posts: What's New, Event, and Offer. Let's break these options down, as they are prevalent for both single and bulk posts.
Each post type will allow use of Location Variables. This is a dynamic way to have unique URLs for each of your locations when making a post both single and in bulk. This is built with UTM parameters. For example, let's say you have 10 locations that are all having the same sale. To track performance by location, you can add in the <Store Code> variable to the UTM based URL so that each location is broken out in traffic reporting.
Listing Management
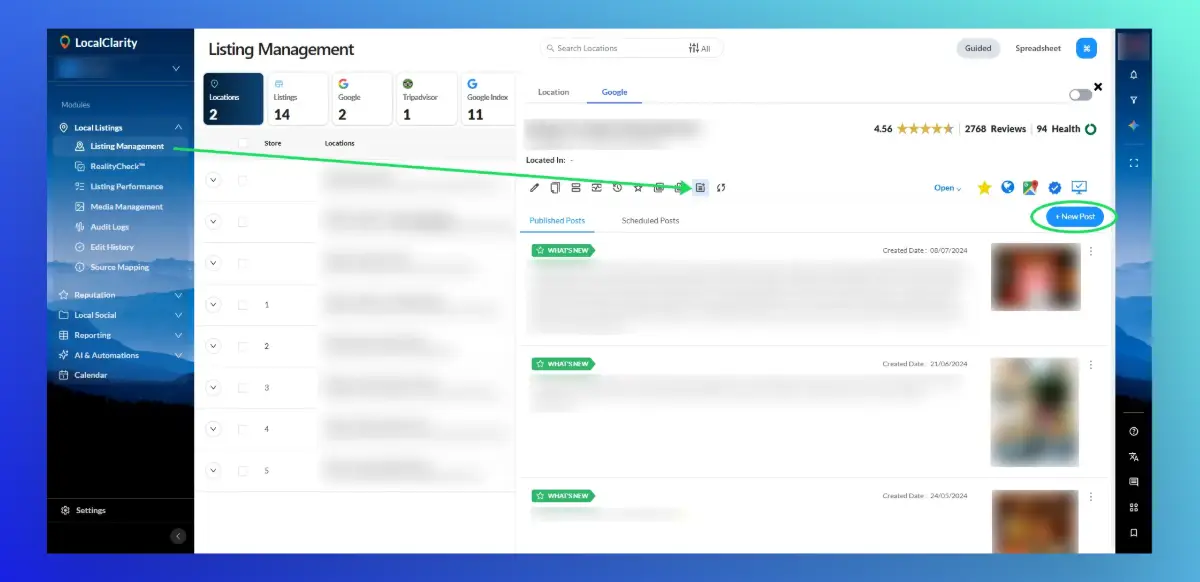
To make a single post in LocalClarity, head to the Local Listings module and then the Listing Management page and select the Google listing for which you would like to make a Post. When the listing view comes up, select the "Posts" tab and then "+Create Post".
Posts & Showcases Page
The Posts & Showcases page in LocalClarity is stored within the Local Social module. On this page, click “Create Post” to launch the Bulk Post Workflow.

Calendar Module
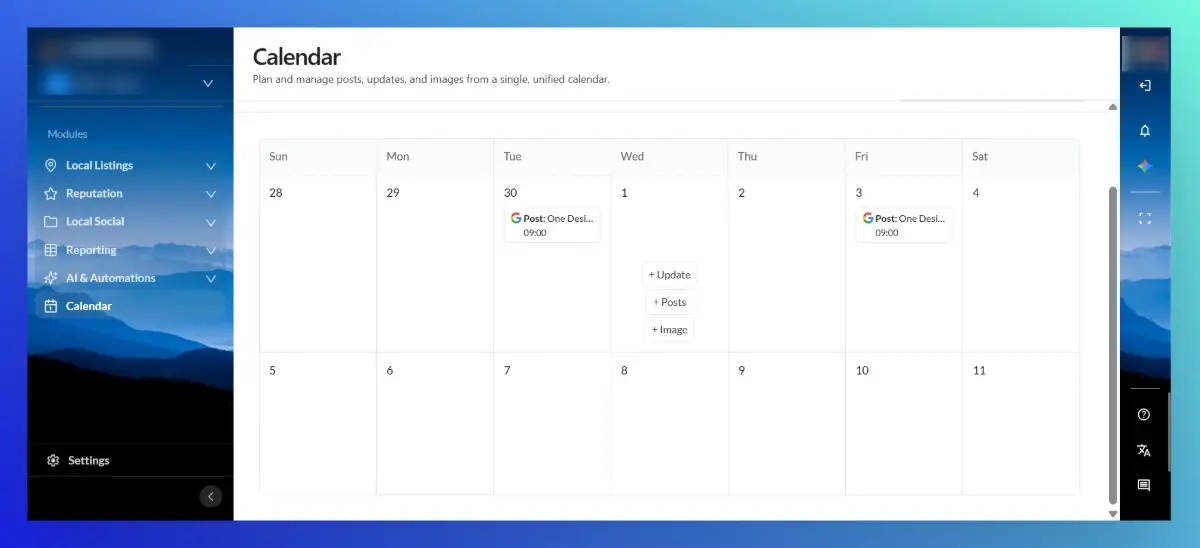
The Calendar module on the bottom of the left navigation menu can also trigger this Bulk Post Workflow. Simply hover over the date on which you want your Post published and complete the forms to schedule it or post immediately, depending on your specific date selection.
Post Types & Capabilities
The post workflow provides three options for types of posts: What's New, Event, and Offer. Let's break these options down, as they are prevalent for both single and bulk posts.
1. What's New
Provide updates on your business on any exciting new changes, whether a new dish at a restaurant, a new GM at a car dealership, or perhaps a major change to store hours.
2. Event
Similar to What's New except for the following:
- Write Your Title: Think of this as your Post's subject line. Be short and to the point of the event, for example: Wednesday Trivia Night!
- Start Time/End Time: How long your Event post will be actively shown. It makes sense to have this from the post date through the day of your event. If you make the Post recurring, make sure the description is evergreen such as: Come down for Thursday Trivia starting at 7pm every week...
3. Offer
Similar to previous two except for the following:
- Coupon Code: If your Offer has an applicable coupon code, enter it here. Example: QUARTER25
- Link to redeem offer: This link will take them to the sale page on your website. This can be built to UTM track performance, more on that below. For example, if you have certain products for 25% off, this link will take customers to the sale page, where they can use the code QUARTER25 to save 25%.
- Terms and Conditions: Optional, but you can put any 'fine print' regarding the offer. For example, code only valid until 3/11 and can't be redeemed on clearance items.

Configuration Options & Guidelines
Location Variables
Each post type will allow use of Location Variables. This is a dynamic way to have unique URLs for each of your locations when making a post both single and in bulk. This is built with UTM parameters. For example, let's say you have 10 locations that are all having the same sale. To track performance by location, you can add in the <Store Code> variable to the UTM based URL so that each location is broken out in traffic reporting.
Character Limit
Every type of post has a 1500 character limit, so include any relevant information. Make sure not to keyword stuff or use hashtags to try to rank higher. Posts are a great way to keep customers in the know, but have no known effect on local rankings. Think about what message you want to convey, and remember potential customers prefer concise messages rather than spammy sounding jargon.
Photos & Image Ratios
Photos are a great way to make your Post more attention grabbing. The recommended ratio is 4:3 and make sure the photo quality is high, as you don't want a blurry or grainy photo.
Campaign Content Name
'Campaign Content Name' is a way to label Posts to keep them organized. This is optional.
Add a Button (CTA)
'Add a Button' is also optional but is a great way to measure the success of a Post. This is your Call To Action. You can have a button for: Book, Order Online, Buy, Learn More, Sign Up, or Call Now.
Link for your button: Once you select an option, 'Link for your button' will appear. This is the CTA link where clicking on the button will take the customer. So if it's Sign Up, include the link for your Sign Up page. For 'Call' no Link is needed, as this will pull from your location's phone number.
Schedule Post
Schedule Post is a slider that you can activate if you want to schedule your post out for the future. Once set, choose between Once or Recurring for your post. While Recurring posts are less common, they can be useful for weekly events such as Karaoke Night (that would be under an Events Post, more on that later). After selecting Once, you can pick the Time and the Time Zone associated. You are now ready to Publish your post!
Bulk Post Details
If you manage hundreds of locations, doing posts one by one is not feasible. There are multiple ways to do a post in bulk in LocalClarity:
Method 1: Multi-Location Selection
Selecting multiple locations in the Locations tab (or Select All) and selecting the +Post option. Or if you have locations grouped, you can filter Locations page by a Group and then Select All.

- This will allow you to make a similar post for all of your locations at once, and using the variables as mentioned before, you can differentiate based on macros such as store code.
Method 2: Flexible Bulk File Upload (CSV)
Alternatively you can leverage the Flexible Bulk File Upload for Bulk Posts. This method allows you to customize the media and timing for each location while posting or scheduling them all at once.
- The first step to making a bulk post through the Bulk Post Workflow is downloading the sample CSV file. After downloading, remove all example data and fill out the fields in order to make a post to your specification. This is an advantageous method for bulk posting for a number of reasons.
- By using the CSV you can change the media by location so if you want different pictures for different locations, you can easily differentiate that here. Simply download the example file and fill in your own information you wish to include in the Post.
Module Breakdown: Posts & Showcases Page
The Posts & Showcases page in LocalClarity is stored within the Local Social module. It has four sections: Google, Facebook, Manage/History, and Reporting.
- Google: Create and schedule or immediately post Google posts.
- Facebook: Use a Flexible Bulk File Upload to Post across Facebook locations.
- Manage/History: Users can view a history of their Posts, past, current, and scheduled. This is also where you can check on whether your Post upload failed due to an error in the CSV.

- Reporting: Over the years, Google has historically provided and then taken away reporting on Posts. In February of 2023, they removed the bulk of their reporting insights. However, as of 2026, they are rolling back out some insight reporting for certain data points, however they are not yet available through the API. Below you can see the currently available reporting on Google Posts within LocalClarity.

Google API Restrictions
- Videos: As of this writing (Oct, 2026) Google's API does not support videos being uploaded through their API. Unfortunately there is currently no way to attach video on Posts through any 3rd Party platform (including LocalClarity), as the API does not accept that medium. While you can add a video individually when creating a Post through GBP, there is no way to do so in bulk. This could be something that changes in the future, but as of now, videos can only be done manually in Google location by location.
- Carousel Images: Google's API does not support carousel image Posts (multiple images) through their API, so this has to be done manually through your GBP.
- GIFs: GIFs are another medium that is not supported through Google's API. Much like video, GIFs have to be included in Posts through GBP and not through any other platform.
Summary
Google Posts are a useful tool to keep customers, both current and future, up to date on your business. LocalClarity allows for multiple ways to make posts in a time saving manner. Continue to keep the public informed, as even if it doesn't change local rankings much, it does improve your virtual storefront.
For additional questions, please reach out to [email protected].


